How to Spot Paint Imperfections That Will Sabotage Your Ceramic Coating in Roseville in Ceramic Coating Roseville, CA
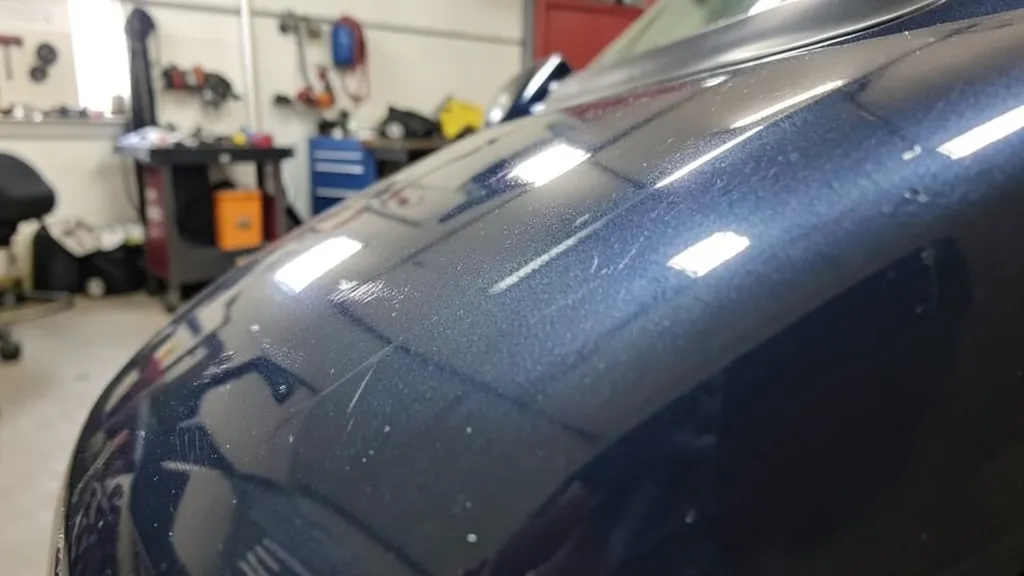
Even the best ceramic coating will fail if applied over hidden paint flaws. In Roseville’s harsh sun and seasonal pollen, imperfections like swirls, oxidation, or water spots can sabotage adhesion and longevity. We’ll show you how to spot them before they become costly mistakes.
Why Paint Imperfections Ruin Ceramic Coating Results
Ceramic coatings bond at a microscopic level to your clear coat. Any irregularity—swirls, scratches, or chemical etching—creates weak points where the coating can peel or fail prematurely.
In our dry, sunny climate, UV damage accelerates oxidation, making paint more porous. A coating applied over compromised paint won’t cure properly, reducing gloss and durability.
The 6 Most Common Paint Flaws We See in Roseville Vehicles
Swirl marks and fine scratches are the top offenders. These are usually caused by improper washing or automatic car washes with abrasive brushes.
Water spots and mineral deposits etch into the clear coat, especially after our hard water sprinkles or summer heat evaporates droplets quickly.
Oxidation appears as a dull, chalky surface. Common on older vehicles or those parked outside in Granite Bay or Antelope without UV protection.
Orange peel texture is a factory defect where the paint looks dimpled. It’s cosmetic but can trap contaminants under a coating.
Holograms—those faint, circular patterns—come from improper machine polishing. They’re visible in direct sunlight, like on Rocklin’s open roads.
Bird droppings and bug splatter leave acidic etchings. If not removed promptly, they eat into the clear coat, requiring paint correction before coating.
| Imperfection | Cause | Effect on Coating |
|---|---|---|
| Swirl Marks | Improper washing, automated car washes | Weakens bond, reduces gloss |
| Water Spots | Hard water, mineral deposits | Creates microscopic pits, poor adhesion |
| Oxidation | UV exposure, age | Porous surface, coating failure |
| Orange Peel | Factory paint application | Traps contaminants, uneven finish |
| Holograms | Improper polishing | Visible defects, reduced clarity |
| Etching (Bird Droppings) | Acidic contaminants | Permanent damage, requires correction |
Tools You Need to Inspect Like a Pro
A high-intensity LED light or sunlight is essential. Angle the light across the panel to reveal swirls, scratches, and holograms.
Use a paint thickness gauge to check for previous repairs or thin clear coat. Areas under 4 mils may need extra attention before coating.
A microfiber towel and isopropyl alcohol (IPA) solution help identify contamination. Wipe a section—if the towel picks up grit or residue, the surface isn’t clean enough.
Essential Inspection Tools
- High-intensity LED light or sunlight
- Paint thickness gauge
- Microfiber towels and IPA solution
- Magnifying glass or loupe
- Clean, lint-free gloves
Step-by-Step: How to Inspect Your Paint Before Ceramic Coating
Start with a thorough wash using a pH-neutral car shampoo. This removes surface dirt but won’t hide deeper flaws like a quick detail spray might.
Dry the vehicle with a clean microfiber towel, then move to a shaded area. Direct sunlight in Roseville can create glare that masks imperfections.
Run your fingertips lightly over the paint. You’ll often feel swirls or scratches before you see them, especially on darker vehicles.
When to Call in a Professional for Paint Correction
If you find deep scratches, severe oxidation, or widespread etching, DIY fixes won’t cut it. These require machine polishing and sometimes wet sanding.
Our team in Roseville uses dual-action polishers and fine abrasives to level the clear coat, removing defects without damaging the paint.
For vehicles in Rocklin or Lincoln with heavy UV damage, a multi-stage correction process may be needed to restore clarity before coating.
Aggressive polishing can thin the clear coat, especially on edges or curves. Always measure paint thickness before and after correction.
How Roseville’s Climate Affects Paint and Coating Longevity
Our hot summers and cold winters stress paint. Thermal expansion and contraction can make existing flaws worse over time, even under a coating.
Pollen and dust in Citrus Heights or Antelope settle on surfaces, bonding with the clear coat if not removed quickly. This contamination can lift a coating if not addressed first.
Acid rain, though rare, leaves etching that’s often overlooked. Always inspect after storms, especially on horizontal surfaces like hoods and roofs.
In Roseville, we recommend a clay bar treatment before inspection to remove embedded contaminants from pollen and road grime.
What Happens If You Coat Over Imperfections?
The coating will amplify every flaw. Swirls will appear more pronounced under the high-gloss finish, and etched areas may show through as dull spots.
Adhesion fails in contaminated or uneven areas. You might see peeling or bubbling within months, especially in high-stress zones like door edges or the hood.
Warranty claims are often voided if the failure stems from improper surface prep. Always document your paint’s condition before application.
Beyond Ceramic Coating: Protecting Your Investment
Pair your coating with paint protection film (PPF) on high-impact areas like the front bumper or hood. This combo is popular among Granite Bay and Rocklin drivers for maximum defense.
Regular maintenance washes with a ceramic-safe shampoo preserve the coating’s hydrophobic properties. Avoid harsh chemicals or automatic car washes.
For fleets or commercial vehicles in Lincoln or Antelope, consider interior ceramic protection to guard against spills and UV fading on dashboards and seats.
How to Test for Contaminants Before Ceramic Coating
This simple test ensures your paint is truly clean and ready for coating.
- 1Wash and Dry
Clean the vehicle with a pH-neutral shampoo and dry thoroughly with a microfiber towel.
- 2Plastic Bag Test
Put your hand in a plastic bag (like a sandwich bag) and run it over the paint. If it feels rough, contaminants are present.
- 3IPA Wipe Test
Spray a 50/50 mix of isopropyl alcohol and water on a microfiber towel. Wipe a section—if the towel darkens, there’s still grime or wax.
- 4Clay Bar Treatment
Use a lubricated clay bar to pick up embedded particles. Re-test with the bag method afterward.
- 5Final Inspection
Under a bright light, check for missed spots, swirls, or etching. If flaws remain, paint correction is needed.
Frequently Asked Questions
Can I apply ceramic coating over minor swirl marks?
No. Even minor swirls will be locked in and magnified by the coating’s gloss. Always perform paint correction first to achieve a flawless finish. In Roseville, we see many DIY jobs fail because of this oversight.
How do I know if my paint has oxidation?
Oxidation appears as a dull, hazy, or chalky layer on the paint, often more visible on horizontal surfaces. Run your hand over the area—if it feels rough or dry, oxidation is likely present.
Is paint correction necessary for a new car before ceramic coating?
Often, yes. Even new cars from dealerships in Rocklin or Citrus Heights can have swirls from transport or dealer prep. A light polish ensures the surface is pristine for optimal coating adhesion.
What’s the difference between a ceramic coating and paint protection film (PPF)?
Ceramic coatings are liquid applications that bond to the paint, enhancing gloss and hydrophobic properties. PPF is a physical urethane film that protects against chips and scratches. Many Roseville drivers use both for comprehensive protection.
How often should I inspect my paint before reapplying ceramic coating?
Inspect your paint every 6 months, especially before winters or after harsh summers. In Roseville’s climate, UV damage and contaminants can degrade the surface faster than in milder areas.
Can water spots be removed without professional help?
Light water spots may be removed with a clay bar and polish. Deep etching, common in areas with hard water like Antelope, usually requires professional machine polishing to restore the clear coat.